This is the first of a series.
Alright folks this essay is going to be as genderfree as possible. Women make and wear men’s clothing, men of a certain size also have to navigate this issue, and third gender or gender eschewing folks need clothing too. To that end I’m avoiding terms like ‘the girls’ ‘the ladies’ ect. I’m also making the conscience choice to refer to the body parts we’re navigating around as ‘boobs’. Yes ‘breast’ is the more scientifically accurate term, but that (to me at least) reads as decidedly politely-feminine in a way boobs just doesn’t. I also just like saying boob. I am a cis woman, so I’m not going to even pretend that I know best, just explaining my choices here. Feel free to substitute your favorite word of choice, gods know the internet is full of ’em.
ON WARDS!
What is ‘boob math’?
Boob math is the complex calculations needed in order to make clothing fit correctly and as intended over boobs. Whether that intent is to downplay their existence, draw attention in a flattering manner, or just support them so you fricken back isn’t killing you after a couple hours, determines what kind of structural physics you need to do here. You’ll note that high fashion uses models with fairly straight lines, even they acknowledge boob math is hard. It’s not just as easy as throwing more fabric in the boob-zone, it’d be awesome if it was.
Today we’re going to start going over how to alter existing patterns designed for those folks without boobs to fit properly with boobs. This is the most simple kind of boob math and why we’re starting here. This will also work for adjusting patterns meant for the boob’d that don’t fit around *your* boobs. I’m assuming you are starting with a commercial pattern. I do not use them (I draft everything every time like someone who refuses to let love into their life) so my photos and such for this are all hand drawn with the shapes you’r’e looking for. Excuse the laughably terrible art.
You will need:
-Your pattern
-Paper to draft on (no special kind, you can use printer or notebook paper and tape it onto your commercial pattern if need be)
-Measuring tape
-A pencil
-Scrap paper for writing measurements on
-Comfort beverage or food of choice
Ok, so the goal here is to be as non-disruptive to the original pattern as possible for ease of sewing it. That being said there’s a bit of pattern drafting involved here. Don’t run away! It’s ok, I’m going to walk you through how to make 2D shapes fit a 3D body. First we’re going to take measurements. I’m going to have you take measurements on both sides of your body, the beauty of pattern drafting means custom fitting and boobs are never the same size. The difficult bastards.
If you intend to wear a bra with this garment, put it on now. For each side of your body you are going to measure:
(A) -From the top center of your shoulder to nipple
(B) -From outer side center (or wherever the seam of your pattern lies) of the rib cage to nipple
(C) -STRAIGHT UP from directly under the boob to nipple (do not follow the curve, trust me)
(D) -From center top of shoulder straight down the side body to directly under the boob (do not follow the curve of the boob, you want a straight line)
(E) – Straight across the front of the boobs from nipple to nipple.
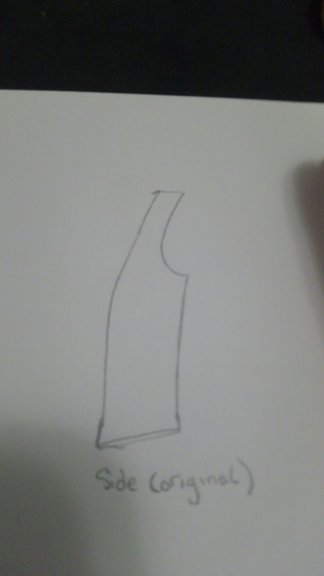
Now look at the bodice pieces for your pattern. There should be a front piece, and a piece with the arm hole cut in. Modern patterns generally give you one of each and say ‘cut 2’. You may need to make a copy and label one Left and one Right. Measurement D is how far down the pattern pieces we’re altering. Clearly mark that on each piece by measuring from the top edge (shoulder) of the pattern down.
Starting side (left) and front (right) pattern piece examples.
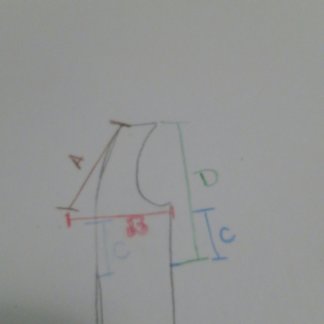
Grab the side pattern piece (the one with the arm hole cut out). We’re making adjustments to the front of it. Now, using measurements A, B and C you’re going basically make a triangle on the side piece of your pattern. Starting from the bottom of measurement D (so as far down the pattern as we’re adjusting), measure up C. Make a dot or a line or some mark you can see. Measure down and out from the top of the shoulder on the pattern for the length of A, adjusting the angle until the point of it lines up with measurement B straight out from the point we made by measuring C up from the bottom point of D. Make a dot or a mark at this point.
Now what you’re going to do is draw a line from the top of the shoulder to the mark made where measurements A and B meet. Then draw a curve down from that to meet the bottom of measurement D. Smooth out where the curve meets the line from the shoulder into a curving transition to avoid awkward nipple points.
Repeat this process for the other side. Grab your measuring tape again and measure how long the total curve your just made is, from shoulder, around the nipple point, down to where it meets the pattern again.
Now take your front pieces. These should be more or less rectangles since most of the fiddly bits on patterns are the side pieces. There may be a concave curve on the edge that meets your side piece, that’s fine and is useful. We’ll get to that. The measurement you just took off your side piece curve is how long the new measurement of your front piece from shoulder to point D is. The concave curve is added to avoid having odd darts and ruffles along where the front and side pieces attach on that curve. You’ll need to rough in a concave curve that matches the convex curve you made on your side piece.
Where all your measurements go. Side (left) and front (right)
Repeat this process for the other side.
Measure from the center point of one of your concave curves to the center point of the other. This needs to be AT LEAST as long as measurement E. If not you will have that dreaded button gaping boob pull situation happening. If there are no buttons or front closure then you’ll still have uncomfortable boob flattening/tugging going on.
Altered side (left) altered front (right)
WHEN YOU GO TO CUT THIS ALL OUT DO NOT FORGET TO ADD THE SEAM ALLOWANCE SPECIFIED IN YOUR ORIGINAL PATTERN TO YOUR FINAL LINES. This is the pitfall I make most often and how I end up with poorly fitting tops even though I know how to draft for boobs.
What we just walked through is basically drafting a princess seam.


